Blog

Yoga Tip: Salute the Sun

This week I filmed a video for the Yoga Tip blog series. This is Surya Namaskara A, aka the Sun Salutation. For whatever reason, the first few seconds of setting Tadasana (Mountain Pose) was cut off, so don't be alarmed at the blank screen for the first 20 seconds while I talk you through the pose- just follow the instructions.

Also, this goes a little fast. It didn't feel fast when I was filming it, so apologies. Just do the best you can, and always remember to go at your own pace. You should pause whenever you need to, bend your knees at any time it feels right, and go into child's pose if you'd like. Hope you get something out of it!!

Yoga Tip: Reverse Triangle Pose


Today I'm writing about a pose that is, admittedly, not one of my favorites...mostly because it is so challenging. It doesn't look so challenging, though, but believe me, it is!! The challenge comes from the fact that it works so many parts of your body- spine, legs, chest, lungs, I mean the list really goes on and on. So here we go.

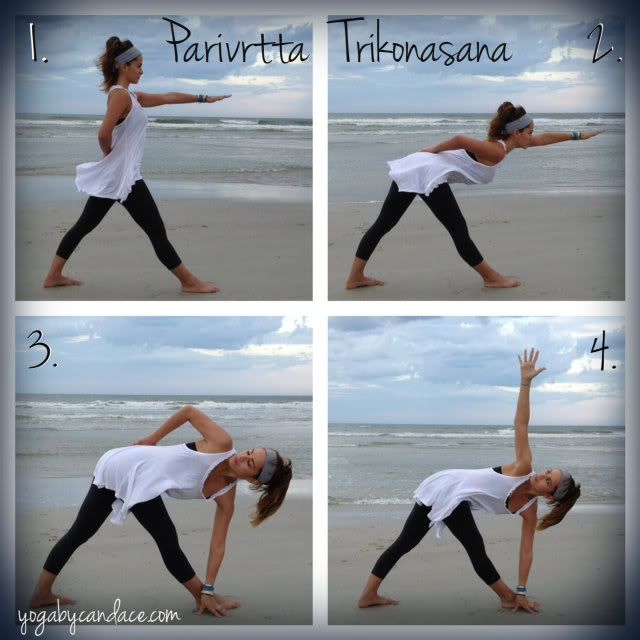
How to do it: {Photo 1} Step about 3 to 4 feet apart, right foot in front, turning your left foot out slightly so your hips face forward. Inhale the spine long and bring your left arm out in front and your right hand to your sacrum.

{Photo 2} Exhale and send your upper body as far as you can comfortably go, reaching forward with energized fingers, feeling one long line of energy from your left fingertips all the way down the spine.

{Photo 3} Inhale and place your left hand down on the outside of your right foot (or inside, if that's easier for you). Exhale and twist from the navel and begin to turn your gaze up. Beginners may need to stay here and work up to step 4 over the next few times they practice this pose.

{Photo 4} Inhale your right arm up straight up and gaze at your right thumb. Maintain energized arms and fingers, lift the kneecaps. Inhale to lengthen the spine, exhale to go slighter deeper in the twist. Exhale to come out of the pose. 

Benefits: Strengthens the legs, Stretches the hips, spine and legs. Improves balance. Stimulates abs and lungs. Opens chest. Helps back pain.

Tips: Once you get your feet in position, you may find it helpful to shimmy the front foot to the right a bit (to the left, when doing the other side). This will help people with naroow hips to maintain balance better.

Yoga Tip: The Backbend

The backbend, aka the wheel pose or in Sanskrit as urdhva dhanurasana (URD-va don-your-AHS-ana) used to be something that came easily to me... you know, when I was 10 years old and in gymnastics class. Eighteen years later it's no surprise that this pose isn't as accessible to me! Anyone feel the same? If so, don't feel discouraged. There's no time like the present to make a change. In its fullest expression, this pose is really amazing and has lots of benefits. 

How to do it: Start by laying on your back. Bend your knees, hip distance apart, with your heels as close to your sitting bones as possible. Bend your elbows and plant your hands into the mat on either side of your head with your fingers pointing towards your shoulders.

Inhale and pressing firmly into your feet and hands, lift your body and head off the floor. Imagine your body in an upside down U shape. Slightly turn the upper thighs inward and lengthen the tail bone toward the knees. Slightly turn the upper arms outward, and look down at the floor between your hands. Breathe with ease through your nose for 2-3 breaths. On an exhale, slowly lower yourself down. Rest. Go back up into the wheel pose if you like a few times. Rest in-between. When you're completely done with the wheel pose, counterpose with child's pose. 

Benefits: Stretches the chest and lungs, works arms, wrists, buttocks, legs and spine. Stimulates thyroid. Great for depression, asthma, osteoporosis, and back pain. Increases energy. 

Tips: When you're in the pose, be sure to push firmly into your finger tips and roots of the fingers. Avoid putting your weight in the palms, as that could hurt your wrists.

Also, be sure to counterpose only once, when you're finished with the wheel pose. Counterposing between multiple wheel poses will hurt your back!

Yoga Tip: Crow Pose

Kakasana, also known as Crow Pose, is a great arm balancing posture. It's fun to play around with it whether you're a beginner or a more experienced yogi. Give it a go and let me know how you find it!

How to do it: Start by squatting with your feet about mat width apart. Inhale and plant your hands firmly into the mat shoulder distance apart. Look about 8 inches in front of you. Find your drishti (focal point) and don't look anywhere else. Push into the fingertips and the roots of the fingers. Bring your knees to touch a couple inches above your elbows and slowly come up onto your tiptoes. Exhale and lean forward, resting your knees and the tops of your shins on your triceps and gently lift your toes off the ground. 

Benefits: Strengthens the shoulders, arms and wrists. Improves balance. Works the forearm muscles. Great for people with carpal tunnel syndrome.

Tips: When starting out, put a pillow under your face. My yoga instructor broke her nose when she fell out of this pose!! Also, be really diligent about pushing into the fingertips and roots of the fingers. Stay mindful not to collapse your weight into the outer edges of the palms- that could injure your wrists.

Yoga Tip: Centering

If you're looking to practice yoga at home, my biggest tip would be to make sure to start with a centering. Generally with workouts, we are so amped up to start that we skimp on the warm up. A centering is like a warm up for the yogic mind. It's a dedicated time for you to completely quiet the mind, and set an intention for your practice, making your yoga session more focused.  

How to do it: Start in a comfortable seated position. Let your hands rest on your legs, or you can bring them into Anjali mudra (prayer position, as seen in the photo). Close your eyes. Relax your shoulders away from your ears, and begin to observe the quality of your breath. Just note how your breath is-  is it shallow or deep? Are your breaths long or short? Then, begin to connect with your breath, setting a bit of intention behind each inhale and exhale. Breathe through your nose. If your mind starts to wander, gently bring it back to the present moment. Set an intention for your practice if you want. An intention is a simple statement for what you want out of your session. (Ex: I want to stay present. Or, I will honor how I'm feeling today.) After three to five minutes, start your yoga practice. 

Benefits: Focuses the mind on your practice which may help to prevent injuries. Allows you to go inward in your practice, transforming a simple yoga workout into something more spiritual. 

Tips: If you can't seem to get comfortable sitting with your legs crossed as shown in the photo, try sitting on a block or a bolster. This alleviates discomfort in the back.

Yoga Tip: Bow Pose

I thought I'd start a series of blog posts with some asana tips. For the first one, I chose bow pose. 

How to do it: Start by laying on your stomach and lengthening the body. Inhale and bend your legs, reaching around with your hands to grab your ankles or lower legs with your thumbs facing down. Exhale, broaden your chest and send your shoulder blades toward each other and down your back. Inhale and with the power of your legs, lift your chest. Arms straight, legs press into the hands. Tilt your pelvis to release any pressure on the lower back. Inhale to lift the upper body, exhale to lift the lower body- this will create a slight rocking motion. Be mindful of your backbend- envisioning a gradual bend. Gently let go and send yourself into child's pose.

Benefits: Done properly and consistently, bow pose will strengthen the back, bum and backs of the legs. It helps digestion, respiratory problems, anxiety and fatigue. It helps to open the lungs, spine and hip flexors. 

Tips: Try to keep the knees no more than hip distance apart to avoid compromising the integrity of the pose.